Class Schedule
THREADWORXS FAIR – JUNE 2026
You may have recently seen some buzz on social media about me teaching at the Threadworx Fair in June 2026… and yes, the rumors are true! I’m thrilled to officially announce that I’ll be teaching two needlework finishing classes at this exciting new event. I can’t wait to dive into all the details with you—thank you for the enthusiasm and support!
The Threadworx Fair is coming to New Harmony, Indiana in June 2026, and it’s shaping up to be something truly special. This inaugural event is proudly sponsored by the Guild of the Wabash—a creative collaboration between Crossing Centuries, Loom Hall Textiles, and Cranberry Bog Cottage.
Set in a charming and historic village, the Fair will feature:
- A judged cross stitch exhibit with ribbons and cash prizes in multiple categories
- A vibrant marketplace full of treasures and tools
- An inspiring lineup of classes and workshops
- Open social stitching
Even better? There are no registration fees required to attend the Fair itself! The exhibit and market will be held in The Granary and are open to all, with donations gratefully accepted at the door. Class sign-ups and payments are handled directly by each instructor, with individual class fees listed accordingly.
And in case you missed it—Teresa Kogut will be the very special guest!
✖✖✖✖✖✖✖✖✖✖✖✖✖✖✖✖✖✖✖✖✖✖✖✖✖✖✖✖✖✖✖
INFORMATION ON MY CLASSES
- Both of my classes will feature exclusive designs created especially for the Threadworx Fair.
- Both classes focus on needlework finishing and will be hands-on.
- Each class is limited to 30 students.
- Classes will be held in Community House No. 2, just steps from The Granary. This beautiful building is an original Harmonist dormitory, owned by the Indiana State Museum, and houses artifacts from the original settlement. We’ll be gathering on the second floor—what a setting!
- I will have a small trunk show/market in my classroom.
- There will be a wait list, once each class fills up.
I’m currently taking reservations on a first-come, first-served basis, so if you’d like to attend one or both classes, be sure to email me to reserve your spot. Once a class fills, I’ll begin a waitlist.
Once your class fee is received (via check or PayPal), you’ll receive the stitching pattern for pre-stitching (details with each class listing below), and please note that at that point, your fee will be non-refundable.
If you’re planning to attend the Fair and want to be on my class roster, go ahead and send me an email now so I can get you on the list. I can’t wait to share more soon!
✖✖✖✖✖✖✖✖✖✖✖✖✖✖✖✖✖✖✖✖✖✖✖✖✖✖✖✖✖✖✖
CLASS 1:
Homestead and Harmony:
A Set of Three Rick Rack Rounds
Friday, June 19, 2026
9:00 AM – 12:00 NOON
Community House No. 2, New Harmony, Indiana
CLASS FEE: $95.00
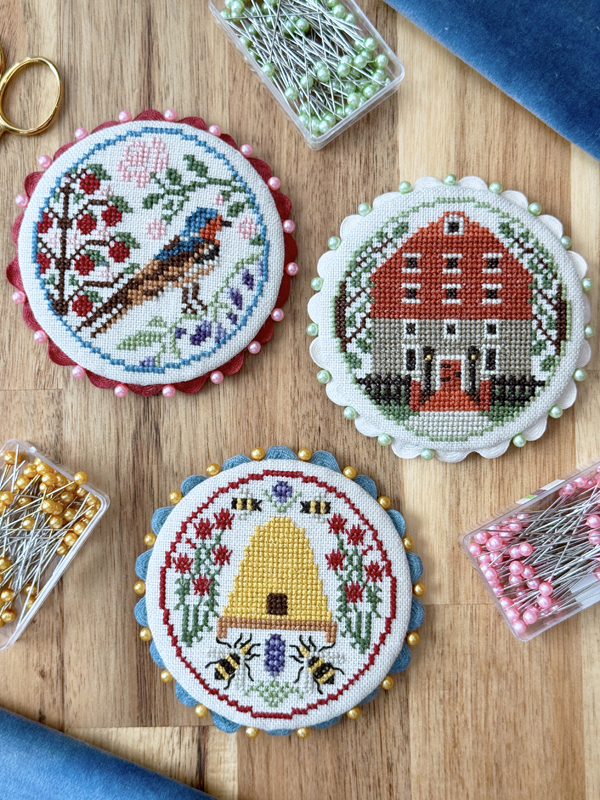
What do you get when you combine cross-stitch, rick rack, sewing pins, and a few charming embellishments? A set of Rick Rack Rounds, of course!
Homestead and Harmony is an exclusive trio of round pinkeeps inspired by the historic charm of New Harmony, the excitement of the 1st annual Threadworx Fair, and a touch of summer patriotism in honor of the Semiquincentennial.
In this 3-hour hands-on class, you’ll arrive with your pre-stitching complete and leave with (at least) one fully finished Rick Rack Round. I’ll guide you step-by-step through my signature round pinkeep finishing technique—perfect for bowl fillers, home décor, or heartfelt gifts. We’ll also explore alternate finishing ideas and dive into tips, tricks, and materials that make finishing fun and approachable.
What’s Included:
- Exclusive PDF pattern with all three Rick Rack Round designs (emailed upon registration)
- Optional: a printed pattern can be mailed for an additional fee
- Complete finishing kit with supplies to finish all three rounds (provided in class):
- Backing fabric (Hand-dyed Velveteen)
- Pre-cut cotton quilt batting
- Pre-cut comic book boards
- HeatnBond fusible interfacing
- Hand-dyed rick rack in three colors
- Straight pins in three colors
- Lacing thread & transparent thread
- Additional embellishments
- Use of adhesives and tools in class
- Detailed, full-color printed finishing instructions will be provided at class time.
Pre-Class Info:
- Pre-stitching is required. An additional option will be available if you don’t have the pre-stitching complete before the class.
- Participants should use their choice of 32-count linen or even-weave, or 16-count Aida; these counts are necessary to work with the pre-cut finishing materials provided in class. While linen or even-weave is preferred for optimal results, Aida is also acceptable.
- Floss and fabric are not included—DMC and hand-dyed thread options will be included with the pattern. Fabric will be neutral in color.
Come ready to learn, create, and leave with a beautiful finish and the confidence to complete the rest at home!
This class will teach you how to finish my signature Rick Rack Rounds.
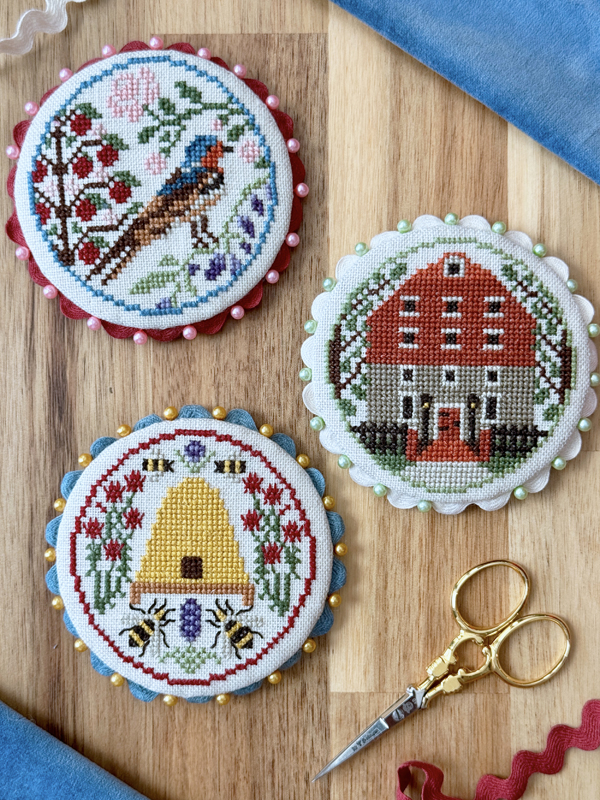
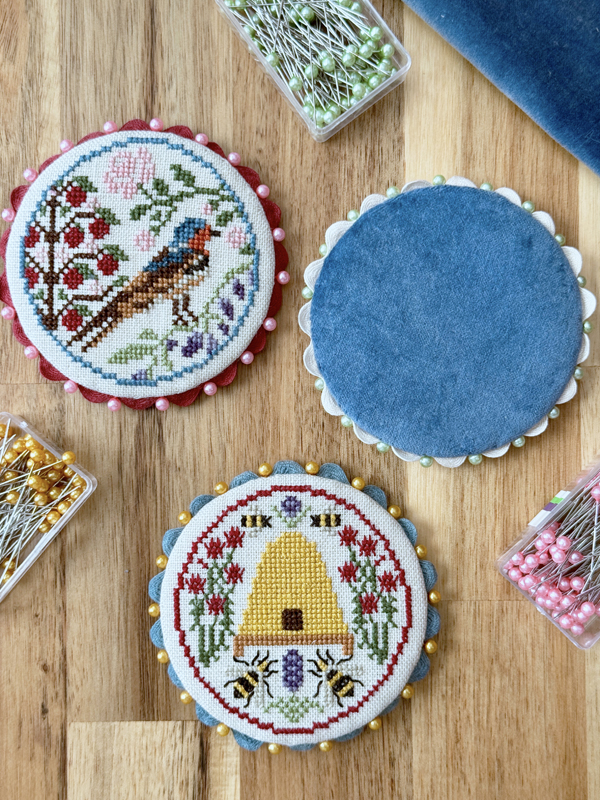
Does the building look familiar? It is based on a photograph of the Rapp-Own Granary, the building where the exhibit and market are taking place!
Other design details of note:
- Harmonist Beehive – representing industry and community
- Wild Roses – nod to countryside, symbol of beauty and faith
- Apple Blossoms – Harmonists were known for large orchards
- Coneflowers and Black-eyed Susan – native Indiana wildflowers
- Granary Building – historic building with unique architecture
- Bees – Pollinators for local gardens
- Barn Swallow – common around historic buildings
- Bee Balm – medicinal herb grown by the Harmonists
- Flowers – grown by the harmonists for ornament, fragrance, and symbolic meaning
✖✖✖✖✖✖✖✖✖✖✖✖✖✖✖✖✖✖✖✖✖✖✖✖✖✖✖✖✖✖✖
CLASS 2:
Perched with a Pennant:
A Pair of Vintage Zinc Lid Pincushions
Saturday, June 20, 2026
9:00 AM – 12:00 NOON
Community House No. 2, New Harmony, Indiana
CLASS FEE: $90.00

These charming sewing birds are uniquely displayed in their repurposed vintage zinc Ball Jar lids, adorned with unique personalized pennants and hand-dyed trims.
Perched with a Pennant is a set of pincushions inspired by vintage sewing birds and festive celebrations. This exclusive pattern includes two coordinating sewing bird designs, each holding a personalized celebration pennant.
In this comprehensive 3-hour hands-on class, participants will arrive with their pre-stitching complete and leave with (at least) one fully finished Vintage Zinc Lid Pincushion. I will provide step-by-step guidance through my signature technique for creating round, padded pincushions with chenille and twill tape trim finishing. Designed with personalization and gift-giving in mind, these pincushions offer an opportunity for creativity. Additionally, we will explore alternative finishing ideas and delve into tips, tricks, and materials that make the finishing process enjoyable and accessible.
What’s Included:
- Exclusive PDF pattern featuring two sewing bird pincushion designs (emailed upon registration)
- Optional: a printed pattern can be mailed for an additional fee
- Complete finishing kit containing supplies necessary to complete both vintage zinc lid pincushions (provided in class):
- Two vintage zinc Ball Jar lids
- Pre-cut cotton quilt batting
- Pre-cut comic book boards
- HeatnBond fusible interfacing
- Hand-dyed chenille in two colors
- Hand-dyed twill tape (vintage ruler)
- Lacing thread & transparent thread
- Additional embellishments
- Foam core
- Use of adhesives and tools during the class
- Detailed, full-color printed finishing instructions provided at class time
Pre-Class Information:
- Pre-stitching is required. An additional option will be available if you don’t have the pre-stitching complete before the class.
- Participants should use their choice of 32-count linen or even-weave, or 16-count Aida; these counts are necessary to work with the pre-cut finishing materials/zinc lids provided in class. While linen or even-weave is preferred for optimal results, Aida is also acceptable.
- Floss and fabric are not included—DMC and hand-dyed thread options will be included with the pattern. Fabric will be neutral in color.
Come prepared to learn, create, and depart with a beautifully finished pincushion and the confidence to complete additional projects at home.
This class will teach you how to finish my signature Vintage Zinc Lid Pincushions.
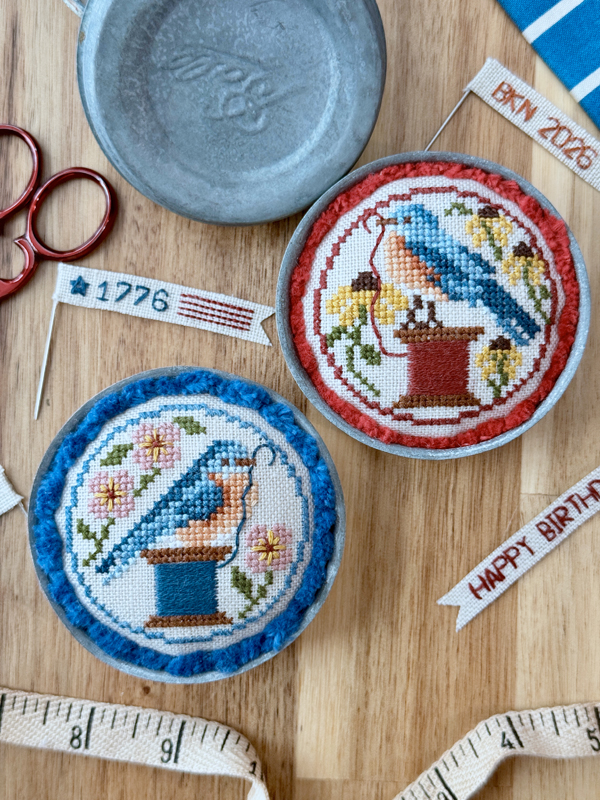
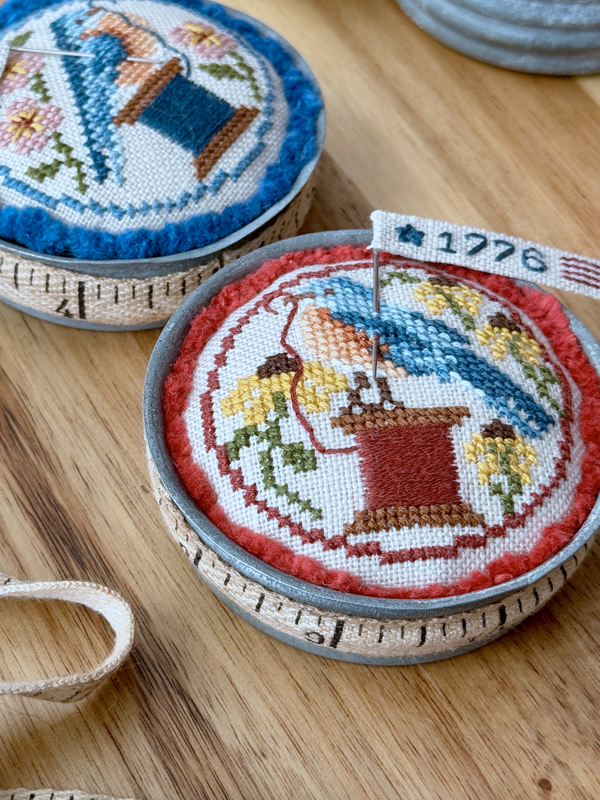
A full alphabet and numbers, along with several charted words/phrases are included to personalize your pennants. Stitch “congratulations” or “for you” or “happy birthday” or add your initials and the year. Celebrate America’s 250th birthday with the special “1776” pennant.
Design notes:
- Bluebirds – symbol of happiness and harmony
- Coneflowers – native Indiana wildflower – common in harmonist gardens
- Roses – symbol of harmony and beauty found in New Harmony historic gardens
- Spool of Thread – a nod to the Harmonist textile and weaving industry
✖✖✖✖✖✖✖✖✖✖✖✖✖✖✖✖✖✖✖✖✖✖✖✖✖✖✖✖✖✖✖
There you have it—all of the available details for my classes at the upcoming Threadworx Fair! I truly can’t express how excited and honored I am to be part of this special event, and I genuinely look forward to meeting many of you in person. Teaching is one of my absolute favorite things to do, and if you’ve taken a class with me before, you already know how much joy it brings me to share techniques, tips, and encouragement. My classes are thorough, hands-on, and fun—you’ll leave with new skills and the confidence to tackle your own finishing projects with ease!
I hope you’ll consider joining me in New Harmony next June—it’s going to be an unforgettable experience filled with creativity, community, and a whole lot of stitching magic.

PREVIOUS CLASSES
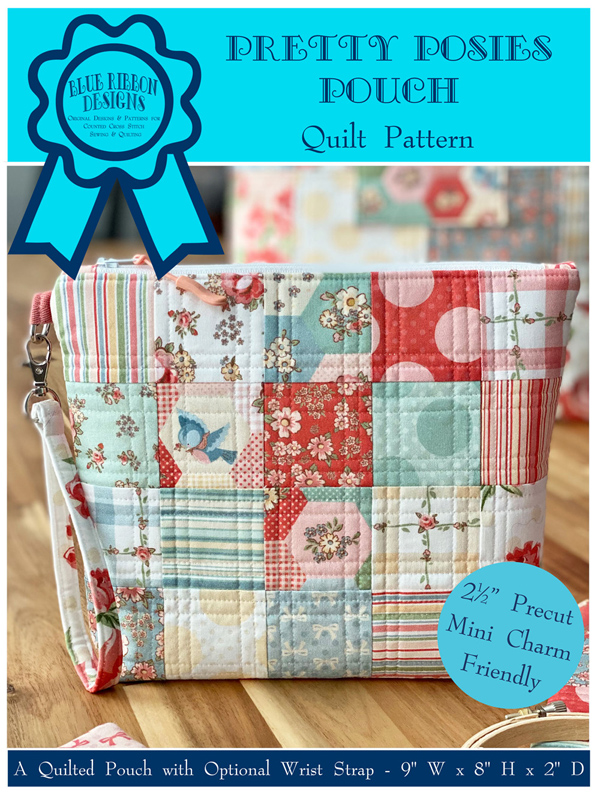
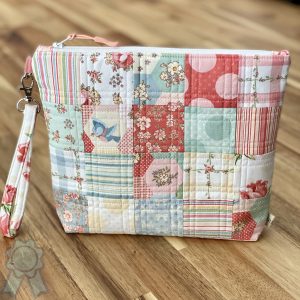
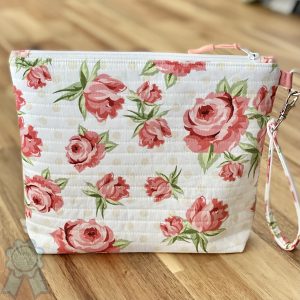
Pretty Posies Pouch
Teaching for The Quilted Sunflower
Location: The Creative Place
$40.00 Includes Patten
I will teach you how to create a zippered pouch from start to finish, including how to insert the zipper, how to box the bottom of the bag and how to attach the wrist strap. If you have your materials cut and ready to sew, my plan is for you to complete the pouch during the class.
Quilted Zipper pouch with Optional Wrist Strap: 9″ W x 8″ H x 2″ D
You must be familiar with your sewing machine and know how to thread and operate it.
Information regarding materials:
• The class fee covers the pattern and the hardware for the wrist strap.
• For the front of the bag (patchwork), you can use a mini charm pack (2 ½” precut squares) or cut any yardage or scraps into 2 ½” squares (jelly rolls or charm packs are easy to cut down…or I think we all probably have plenty of scraps for 20 – 2 ½” squares).
• The back of the bag is a coordinating focal print – a fat quarter works well. If you do not have a fat quarter and are getting yardage at the quilt shop, I would suggest getting 1/3 yard to cover the width needed – this will give you plenty for two or three bags.
• The interior of the bag (lining) is a coordinating print – a fat quarter works well. I suggest a light color solid/small print to be able to easily see the contents when in use. Again, if you do not have a fat quarter and are getting yardage at the quilt shop, I would suggest getting 1/3 yard to cover the width needed – this will give you plenty for two or three bags.
• Fusible fleece and fusible interfacing – see pattern for requirements.
• 12” zipper – ANY zipper with a length of 12” OR longer will work.
• 3” piece of twill tape – this is optional – you can sew a tab, use 5/8” grosgrain ribbon, or I will have a small selection of twill tape with me for class use.
• Zipper pull or charm – this is optional – the zipper doesn’t have to have a pull or charm; it is a finishing touch. Ribbon works well and I will talk about how to use leftover zipper tape (if your zipper is longer than 12”) for an easy coordinating pull.
What to bring:
You will want to have your sewing machine and basic sewing supplies with you. The Creative Space has a couple cutting stations with cutting mats (you’ll need to bring a rotary cutter and ruler), and a couple pressing stations with irons. You will want to have pins with you and if you have wonder clips, they may be beneficial. If your sewing machine has additional presser feet, such as: a patchwork foot or a zipper foot or an invisible zipper foot (or I like to use what is called a mega piping foot), please have those presser feet with you. The project can be completed without specialty presser feet, but they do make the project easier. We will be working with multiple layers, so I would suggest a 90/14 needle.
We will have a casual break for lunch – you may want to bring lunch or snacks with you.
Before class:
Please complete the cutting instructions found on page 1 of your pattern. You
do not need to do any sewing before class, but you are welcome to sew your
2½” squares together (page 2, step 1) to get a head start.

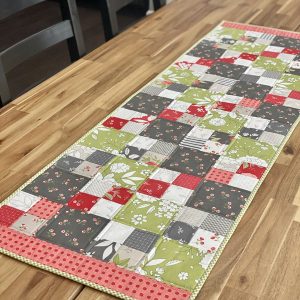
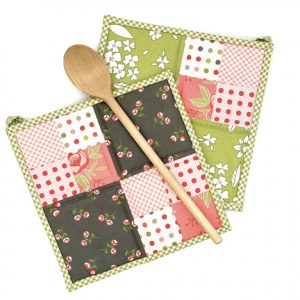
PATCHWORK Quilting 101
Teaching for The Quilted Sunflower
Location: The Creative Place
$40.00 Includes Patten
A class to learn the fundamentals of quilting. This is a beginner class or a great refresher class for a seasoned quilter. Class will cover basic tools/notions, fabric selection and care, rotary cutting, accurate piecing and pressing, quilt layering and basting, quilting with a walking foot and binding.
Class will cover creating two patchwork pot holders and a patchwork table runner. Plan to finish your pot holders in class and get a good start on your table runner.
Table Runner : 52″ x 16″ Pot Holders: 8″ x 8″
You must be familiar with your sewing machine and know how to thread and operate it.
Information regarding materials:
• The class fee covers the pattern.
• Details regarding the materials needed for the projects are on the back of the pattern you received when signing up for this class. You will want to bring a neutral sewing thread for piecing and a coordinating thread for quilting. I will be demonstrating machine binding using Dritz Wash Away Wonder Tape, so you may want to have that on hand, as well.
What to bring:
You will want to have your sewing machine and basic sewing supplies with you, along with the materials for the projects. The Creative Space has a couple cutting stations with cutting mats, and a couple pressing stations with irons – you’ll need to bring a rotary cutter and ruler(s). You will want to have fine sewing pins with you and if you have wonder clips and/or curved quilting safety pins, they will be beneficial. If your sewing machine has additional presser feet, such as: a patchwork foot and/or a walking foot, please have those presser feet with you. The projects can be completed without specialty presser feet, but they do make the projects easier. We will be working with multiple layers, so I would suggest a 90/14 needle (an 80/14 needle would work, as well). You may wish to have a notebook and writing utensil to take some notes.
We will have a casual break for lunch – you may want to bring lunch or snacks with you.
Before class:
You do not need to do any cutting or sewing before class, we will be covering
each step in class.
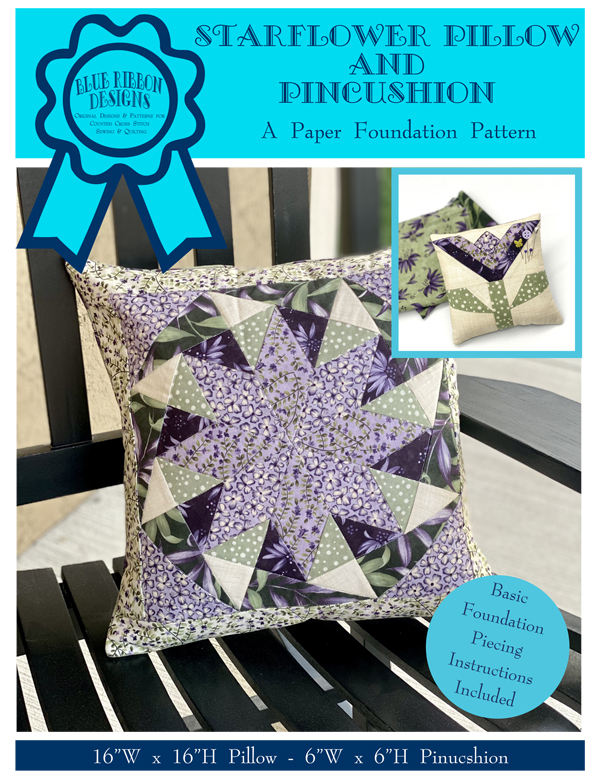
Foundation Piecing 101
Teaching for The Quilted Sunflower
Location: The Creative Place
A class to learn the fundamentals of foundation piecing. This is a beginner class or a great refresher class for a seasoned quilter. Class will cover tools and paper types, cutting fabrics and using scraps, placing fabrics and trimming, working with sections, removing papers.
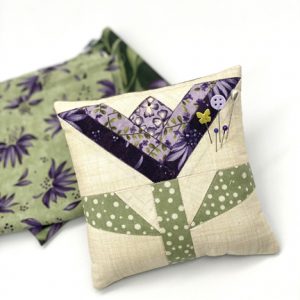
Class will cover creating a foundation pieced pillow and pincushion. Plan to finish your pincushion in class and get a good start (if not finish) your pillow.
Pillow: 16″ x 16″ Pincushion 6″ x 6″
You must be familiar with your sewing machine and know how to thread and operate it.
Information regarding materials:
• The class fee covers the pattern.
• Details regarding the materials needed for the projects are on the back of the pattern you received when signing up for this class. You will want to bring a neutral sewing thread for piecing and a coordinating thread for quilting. The materials listed on the pattern will cover the class projects and some practice piecing, but you may want to bring some fabric scraps along to practice.
I will be printing and providing the foundation papers for each student on newsprint for working in class, so you do not need to copy or trace the foundations found in the pattern.
What to bring:
You will want to have your sewing machine and basic sewing supplies with you, along with the materials for the projects. The Creative Space has a couple cutting stations with cutting mats, and a couple pressing stations with irons – you’ll need to bring a rotary cutter and ruler(s). For foundation piecing, you might find it more convenient to have a personal cutting mat at your work station, along with a small iron and pressing mat. A CM Designs Add-A-Quarter Ruler (6” or 12”) will be quite beneficial (but is not a requirement). You will want to have flathead sewing pins with you and if you have wonder clips, they will be helpful. If your sewing machine has additional presser feet, such as: an open toe foot, clear foot, and/or a patchwork foot, please have those presser feet with you. The projects can be completed without specialty presser feet, but they do make the projects easier. We will be working with multiple layers, so I would suggest a 90/14 needle (an 80/14 needle would work, as well). You may wish to have a notebook and writing utensil to take some notes. Some optional items we will be discussing, and you may find quite useful: colored pencils or markers, water soluble glue pen (Sewline), paper scissors, fabric scraps, and a hand needle and thread to close the pincushion opening after turning and stuffing.
We will have a casual break for lunch – you may want to bring lunch or snacks with you.
Before class:
You do not need to do any cutting or sewing before class; however, if you wish
to cut the fabrics on pages 1 and 2 of your pattern (you will want to label
them), you will get quite a bit more done in class.